Amiga floppy drives are a bit special. They follow the 34pin Shugart interface but usually floppy drives for PC computers do not work straight out of the box.
Why?
1) PC floppies are usually hardwired to Drive Select 1.
2) They generate a Disk Change signal on PIN 34
3) They do not generate a ready signal
Amiga floppy drives require:
1) DS0 set for the internal drive
2) Disk Change signal on PIN 2
3) Ready Signal on PIN 34
Now in the old days (until the middle of 90s) PC floppy drives used to come with all the jumpers that could be changed for satisfy the above requirements.
Recent floppy drives however (cost cutting?) do not sport any jumpers.
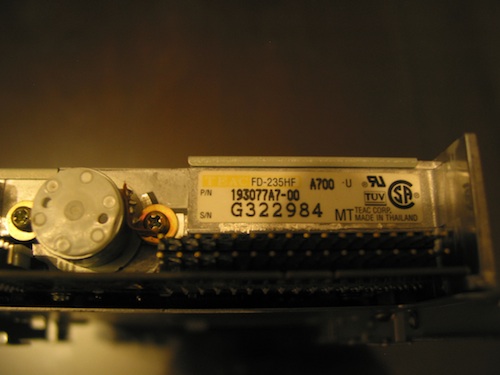
I was lucky enough to find a TEAC FD235HF – A700 somewhere in my old hardware closet.
This floppy DOES have the necessary jumpers.
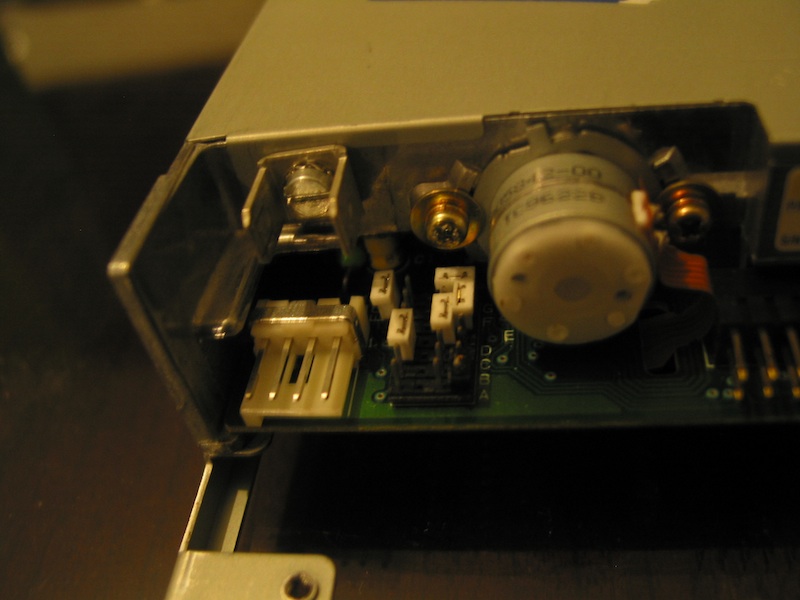
For the back it looks like that:
How do you set the jumpers to make it compatible with the Amiga?
In the picture you can see 7 rows of PINs. They are labelled as A, B, C, …, G.
Each row has 3 columns of pins, apart from the last 2 rows, F and G where you can see an extra column (at the left) of 2 pins. This column just makes a short between the frame of the floppy and DC 0V so we can ignore it.
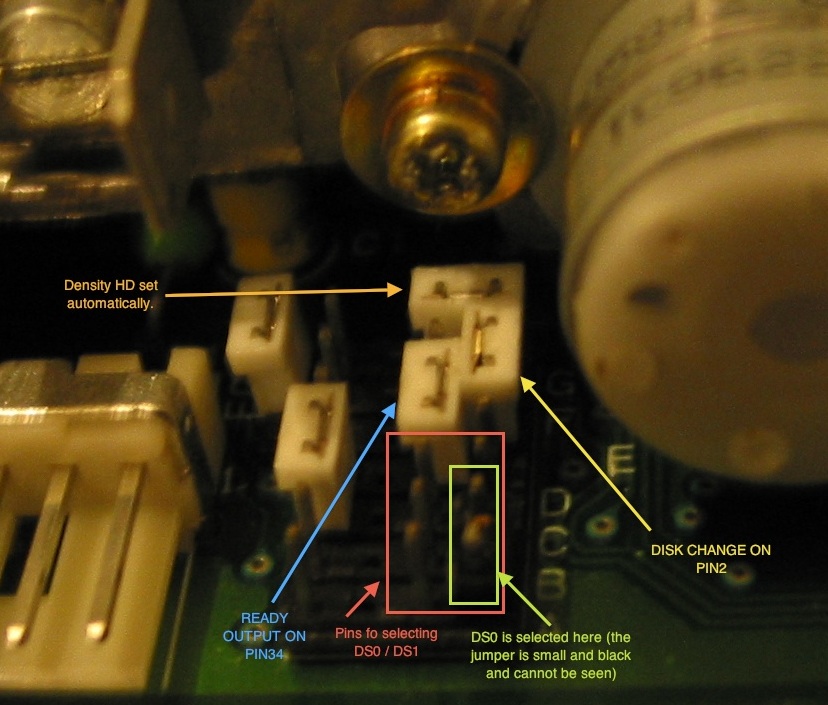
For the rest of the pins lets have a look at the following picture:
The red box shows 6 pins. Those controls the DS settins of the drive.
In the picture DS0 is selected, as shown in the yellow box (I didn’t have a spare white jumper so I used a small black one from an old hard drive that unfortunately can not be seen in the picture)
The jumper shown with the blue arrow controls the Ready signal: in this settings it goes on pin34 as required by the Amiga.
The yellow arrow shows the jumper that controls the DISK CHANGE signal. In the setting shown here is goes to pin 2 of the shugart interface which is, again, what Amiga is expecting.
That leaves us with the jumper controlling the HD behaviour. As shown in the image it is set to AUTO. This has the side effect, that HD 1.44 floppies WILL NEED a tab covering the 1.44 hole to work as 880 floppies.
There is another alternative of placing this jumper vertically, on the last set of pins on the right columns (between rows F-G). This will force the floppy to guess the density from the HD IN signal on PIN 2 of the shugart interface. I guess Amiga will not send such a signal on PIN 2 so the drive will default to double density.
HOWEVER, since the Disk Change Jumper that we described earlier occupies one of the pins, I could not find an easy way of having all those 3 pins jumpered. Does anybody know if jumpers that can occupy 3 pins in a row exist?


Interesting information! I came here, because I was looking for information about the Amiga floppy drive HD switch – is it necessary (for DD floppies) and does the drive use the information? I know the magnetic material is different for DD and HD. I have once back then formatted a HD in Amiga format. It worked fine for a while, but the the disk started having errors. I guess the magnetizing wasn’t strong enough.
Anyway, I just did the same as some 15 years ago: opened the write protect / disk inserted dual switch for cleaning. The switch breaking the connection while the disk is inserted, will eventually jam the file system (on 1.3 OS at the least). That’s what happened while I was editing a short piece of music some weeks ago. So I decided to clean the switches. I also took some fancy macro photos of the switches and drive parts 🙂 Now it seems I mis-assembled the HD switch. It’s a nasty one in my drive and I really am not sure how should it work. The pin comes up by the internal spring, but electrically it may be dead. The contacts on the board are in a tight spot, so my first measurement was not reliable. It may or may not work. In case it does not work, does it give correct or wrong signal concerning the disk capacity? I’ll find that out. Presumably I end up digging out a random drive and desoldering a replacement switch from it. Until then, good night!
Moi Sami.
Thanks for your comment.
I think the HD switch works in conjunction with the HD setting of the drive (if there is any — in the case of the floppy drive shown in my post you can see that the relevant PIN controlling this behaviour exists.)
So if the switch is functional it informs the drive about the inserted disk density. How the floppy drive decides to use this information entirely depends on the HD setting.
In your case as you mention that your HD density detector switch is broken your drive is stuck either in HD or DD mode. If you can force your drive chip to always assume floppies are of one type (via a jumper) then perhaps you can set it to DD mode and rid yourself of the problem of covering the HD tab on the floppy as well as your broken density detector switch.
Also unless you are 100% about the quality of your floppy disk try more 1.44 disks as you may have been using one that developed a fault.
I’d recommend you also check a web page of an old colleague of mine regarding floppy drives for amiga: http://jope.fi/drives
Let me know about your findings!
If you would like a more advanced (and cheap) solution to use SD instead floppy this project could be useful
http://amigadrive.blogspot.it
Hi again – it’s been a few years!
I had saved my comment on Google Drive, with the URL, just in case, and now I went to click that URL – here we are! Now I see you had replied in 2013. There was no email notification – or was there… can’t really remember 😀
Anyway, what I did with my HD switch was super easy. I figured out how it should work (connect or not) on DD floppies, removed the switch and made a permanent connection (soldering, I just cannot remember was it open or closed). I only use DD floppies, I don’t think 1.3 supported HD… Now I’m wondering why there is the HD switch, but I guess it’s because it is uselful to know what kind of floppy there is.
I didn’t do testing on multiple HD floppies, DD floppies work well.
P.S: Right now I’m replacing capacitors to MAKE AMIGA GREAT AGAIN! I have a real studio now, I need to play my old songs on OctaMED with synths, while pushing with the inevitable (?) switch towards DAW tools. I got a Linux computer for that, with multi-IO cards, just need some mental effort.